Tuesday, December 28, 2010

Burner Windguard build

I wish I would have snapped some photos of the actual fabrication process. In particular the shapes of the cuts for this wind guard.  I think it came out quite nice.  It is very practical, and works very well.

I used a 10' roll of 14" wide aluminum flashing and some aluminum short-rivets.

I used tin snips to cut the flashing, but in all honesty I think a decent pair of heavy duty scissors, similar to the type that come with a knife set for cutting meat and poultry bones and such would work better  The flashing was almost too thin for the snips.

Regardless, a few calculated cuts aside, an 1/8" drill bit, a rivet gun, and a small amount of foil tape, made a very effective wind guard that isn't too hideous.

Here she is in all of her glory:


By the way, I used a wire coat hanger to hold up the burner. It was hanging down some, and the burner wasn't level; I assume from the intense heat. Although the heat rises, it has gotten hot enough to crack the porcelain tile I set this on top of when brewing. I hope you like it, feel free to comment, or ask any questions about the actual fabrication.

Saturday, December 18, 2010

Belgian Wit II Brewday...

No pictures of this brew-day unfortunately, but a blog update nonetheless.

I brewed up a batch of my BelgianWit recipe.  This time I was able to get the pale 6-row, instead of subbing the pale 2-row malt.

Brew-day started off well, I used my newly acquired hops, so a second difference in this recipe was the substitution of Chinook for Northern Brewer for bittering, and Saaz in place of Tettnang for flavor and aroma additions. I was able to source bitter oranges locally and I believe the bitter orange to be the one item absolutely necessary for Witbiers. Unfortunately could not get the whole Chamomile flowers like last time, so I used some 100% organic Chamomile Tea instead.  So substitutions aside everything that needed to be in the brew made it in.

Here is what went wrong with brew-day...

1. Beersmith calculated strike-water temp at 163.5°F, my strike-water temp was actually about 167°F. In the past I have normally added my strike water about 10°F warmer, but I usually end up stirring the crap out of the mash for 10-15 minutes to reduce the temperature to the proper rest temp.  So this time I tried to shave a few minutes off by starting a little cooler.  We did have some colder weather here in AZ, and I used a bucket to transfer my water, so I'm sure  I lost a degree or two there. I believe last time I emptied the strike water directly from the pot into the MLT, why I did it differently this time is any one's guess. 

2. So my rest temperature for this brew was 148°F but after stirring in my grain and such and allowing 10 minutes for the MLT temp to equalize my rest temp was about 145°F, I added a gallon of 180°F water, which remedied the situation...

3. ...oh but wait a second I forgot the oats in the mash, and I noticed with 25 minutes left out of the 60 minute mash,so I stirred in the flaked oats as quickly as I could attempting to lose as little heat as possible, and reset the timer for 60 minutes, therefore my total sacharification rest lasted bout 95 minutes, not too bad, a little extra time for conversion, I've done it before, but the 6-row was added for the extra diastatic power it had to convert the oat starch...

4.  So when I began to vorlauf, my mash temperature was about 145°F. I hope the wort did not become too fermentable.

5. Pre-boil gravity should have been 1.090, actually came out to 1.076, Original Gravity should have been 1.056, actually 1.050...

6.  I ended up with about 7 gallons instead of 6, so I did not have the boil-off rate that I am accustomed too.  Again, I'll chalk it up to the cooler temperatures we have had here.

What went right with brew-day you might ask?

1.  I got my boil going quickly

2. All of my hop and spice additions were on schedule

3. I hate the chilling process, and instead of the 40lbs of ice i go through in the summer, I was able to get my wort chilled to about 67°F in about 30 minutes with only 20lbs of ice...that is actually really impressive with my setup.

4. I made a nice size starter, and my wort was fermenting within a couple hours

5. For some reason, clean-up didn't seem too bad this brew-day, maybe because it is cooler, and the last time I brewed it was in the 100's!

This beer will probably be fermented out within 4-5 days, but I will allow it 14 days in the primary.  I am an advocate of the extended primary, most beers I would let sit for at least 3 weeks, usually 4, but Wits are meant to be drank young (one of the reasons I chose this beer to be my first to brew out of the 4 I plan to produce over the winter school break), I'll rack to a keg after the two week primary,  and let it carb up for an additional two weeks, and then it will be ready to drink!

I thank those of you who stopped by for brew day, and shun those of you who didn't...asses!

Well that's about it for this update, oh I did want to add, be on the lookout for my next project which will be mini-fridge fermentation chamber build, I hope to get that done early in the NewYear, so if you are following keep your eyes peeled!

Thursday, December 9, 2010

Hops Arrived!

My hops order arrived!

I was really excited to be receiving 6 lbs of hops. so here they are, nothing to exciting to the lay person.


As you may be able to tell, the Chinook bag didn't have an airtight seal, so I wanted to repackage them to ensure their freshness.


It appears that only 8 oz of pellets will fit into a pint mason jar.  I vacuum sealed my jars with my nifty $3 yardsale foodsaver, and jar attachment.


As usual, HopsDirect is famous for tossing in a couple extra ounces.  I ended up with an additoinal 2.5 oz of Chinook, I'll assume the same with all of my other pellet varieties.


Unfortunately, HopsDirect didn't have any Simcoe, I don't know if they grow that variety. So I placed an order from Brewmaster's Warehouse, for an additional 5 oz of Somcoe that one of my next recipes calls for, a Balck IPA, or Cascadian Dark Ale, whichever moniker you prefer.

Also, 1 lb of leaf hops is a ton! I purchased leaf varieties for dry hopping, and once the bag was opened and the vaccuum seal broken, I had hops coming out the wazoo.  Smelled good though, and my fingers were sticky-icky with lupulin glands.

Friday, November 26, 2010

Hops, Hops, Hops, Hops, Hops, Hops...pt.1

I just placed an order for hops through Hops Direct. They had a 5% off the order promotion for black Friday.

I purchased one pound each of 6 varieties:

Chinook - pellets
Willamette - pellets
Fuggle (UK) - pellets
Saaz (US) - pellets
Amarillo - leaf
Cascade - leaf

I should be set on hops for Witbier, Stout, APA, IPA, and other hoppy brews.  I will make sure to post pics of my stash when they arrive. I'm excited.

I plan to brew 4 beers, in 4 days during the winter break, we'll see if it happens.  If so I'll have a 4 beers/4days post in about a month, till then stay tuned for pics of the hop shipment!

Tuesday, September 21, 2010

GABF 2010 Denver, CO.

We had a blast in Denver at this year’s GABF.  I hoped to take more photos than I did, but I was too busy sampling the awesome brews, and taking care of my 6 month old, who also attended, and loved it!
The top 5 breweries I sampled were:

5. Short’s Brewing
4. Lost Abbey
3. Dogfish Head
2. Jolly Pumpkin
1. New Glarus

By far,  New Glarus was the best!  I am on a sour beer kick right now, and I loved their beers, it is a shame, and a blessing that they do not sell their beer outside of Wisconsin. It’s a shame because it is so good, but it is a blessing, because they keep their quality high, and it gives me a reason to visit their brewery!

Jolly Pumpkin was a treat, once again, at this time I am really into the sours, and they have some delicious beers, don’t ask me to remember exactly what I had, but they were good.

It was a tough decision to place Dogfish Head and Lost abbey, I chose Dogfish Head above Lost Abbey because they had some really off the wall brews there and Bitche's Brew through a coffee bean randall was awesome, however, Lost Abbey’s Angel’s share was really, really tasty.

As far as Short’s Brewing goes I threw them in there because they had some really interesting beers, like a spruce infused pilsner, and a black licorice lager, and a very good barley wine aged on raisins, very different tastes. Plus their line was never ending.

So there you have it, hopefully I can make it back next year. If you are planning to attend and are an AHA member, only go to the Friday night session, and the Saturday afternoon members only session. It will give you plenty of time at the show to enjoy it. Do not attend the Saturday night session, it is the busiest, the crowd is more rowdy, and the vendors start to run out of beer.

If you are not a member, I suggest going to the Thursday evening session, it is by far the least busy other than the Saturday afternoon session.
When you do make it, be sure to stop by the American Homebrewer’s Association booth to say high to Gary Glass, tell him Tyson and Cheryl sent you!

Enjoy the few pics I managed to take:

Gary Glass, Tyler Keith, and Charlie Papazian.  I think Tyler approves of Gary's superb goatee.

Yours truly, Gary Glass, Tyler, and my better half.  I think Tyler is thirsty! Hurry get him a sample!

Tyler and Dad having a blast! (BTW, see the guy behind me on the left side of the photo, he was security, and was talking to some chick who was freaking the 'F' out because she was seperated from her boyfriend, and had severe anxiety issues...can you say freak? Better yet can you say make a plan before coming to an event like this so if you do get seperated you can meet somewhere, maybe bring cell phones?  Even better, maybe don't put yourself in situations where you are bound to have a problem with you anxiety issues!)

(Notice the guy over my shoulder still there, yeah it was a long ordeal...)

Happy mother and son, especially son after a diaper change!

Some of the people at the show are hardcore with their pretzel bandoliers. (Dude nice shirt, and skirt, real kilts are plaid, poser!)

We stopped at Rock Bottom Brewery to have some lunch and a couple of beverages, Tyler was not impressed with the beer selection.

On the last day we were there, we went to the Glass house and Tyler got to meet his cousin Mya, to the left is Erin Glass, Gary's wife, and the Brewer's Association coordinator.

There is a couple of other photos I want to upload, but they are not on my computer yet, so I'll add them to this post later.

Otherwise, go to GABF when you get the chanceit is a blast, there is a lt to learn, alot to taste, and some beers you may not be able to find in your local area.

Wednesday, August 18, 2010

Great American Beer Festival Tickets Arrived!!!

I received my GABF tickets in the mail yesterday!!! I am very excited!

Lets take a look shall we?


The envelope is open, the suspense is killing me!


Awesome!


Members get their own entrance to the event, makes me feel like a VIP!  ;P


Saturday afternoon is just for AHA members. Ah, privileges.


Ouch! That stings...I guess being in a drunken stupor for 4 days wills help ease the pain!


FWIW, I plan on taking a shit-load of photos during the festival, so I will post those near the end of September...

Next time Sour Project update, stay tuned.

Love Temperature Controller (TS-2) Install...Finally!

So I finally found the time to install my temperature controller, and boy was it a journey.
I apologize for not being more detailed with this install. I am usually fairly detail oriented when doing a write-up, however I failed to snap as many photos as I would have liked to, so I will provide more detailed explanations along with the photographs I have.

It begins...


First, the obvious, find the best place to install the controller. Since the original analog thermostat is located on the right side of the fridge that seemed like the logical place to install the controller.


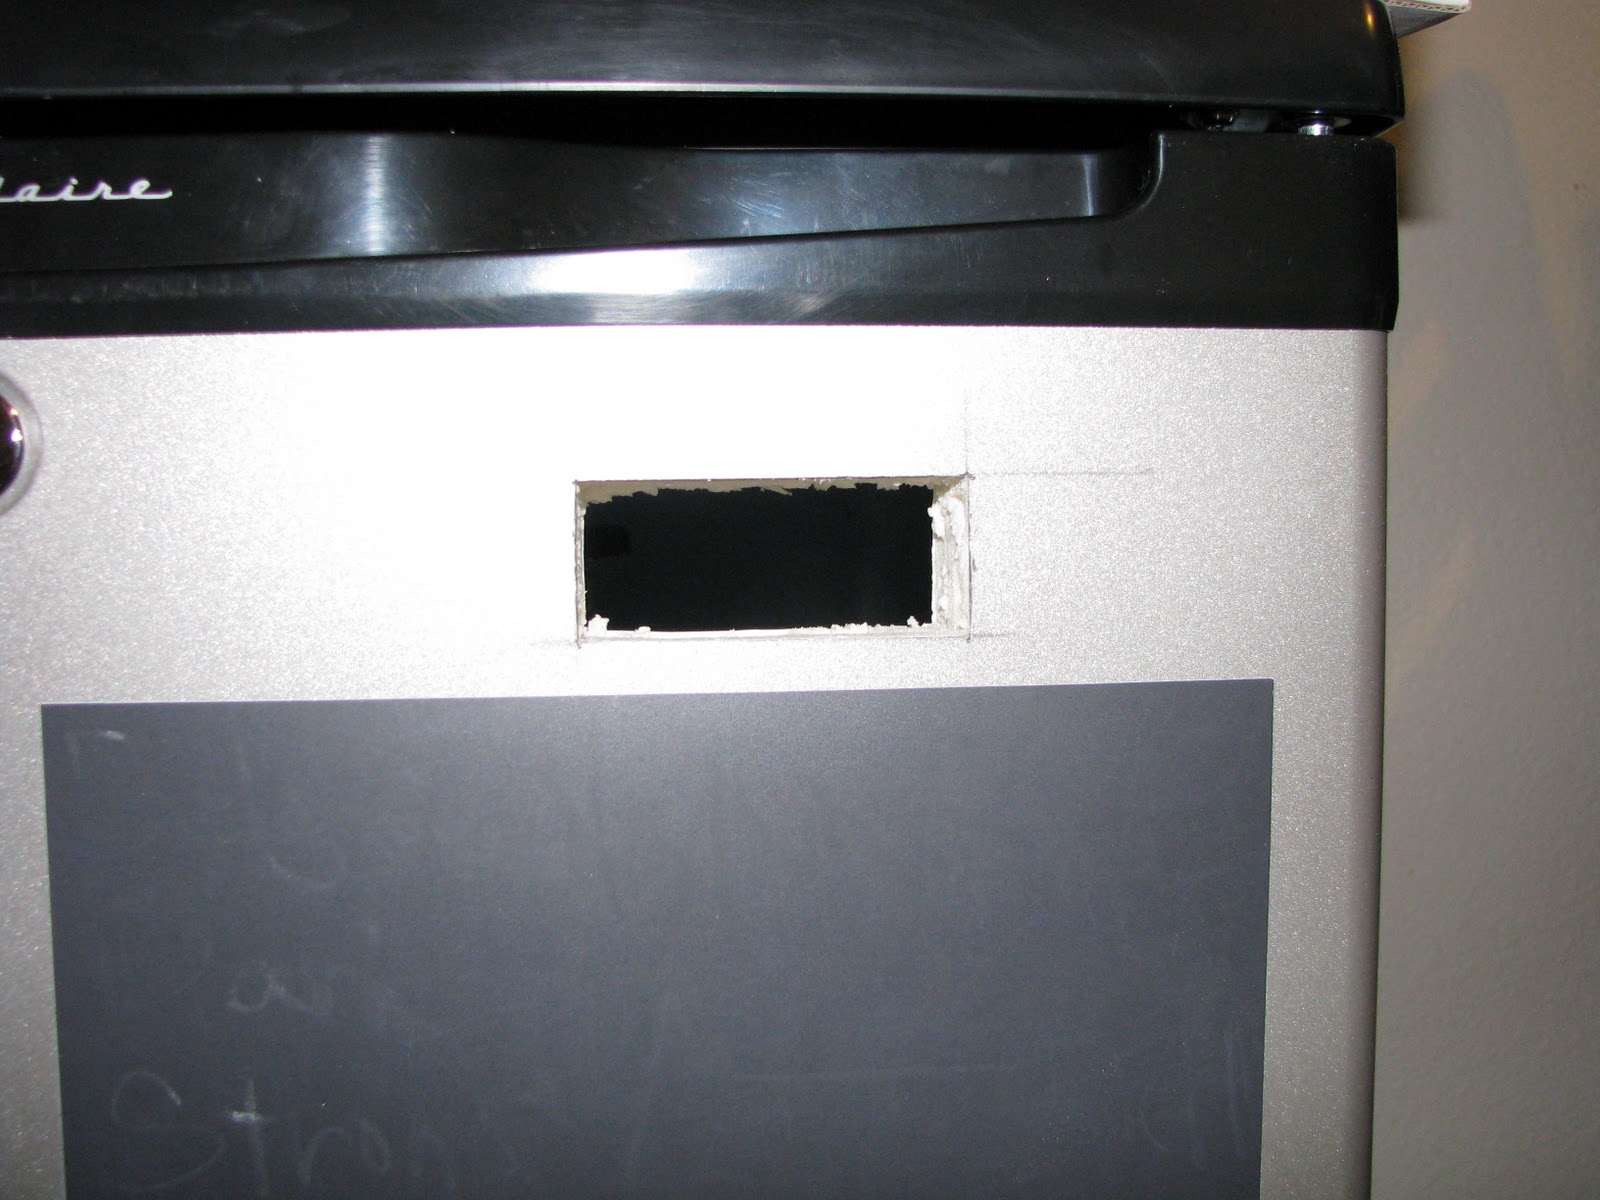
The right side top corner of the controller cut-out was measured 2.5" down from the top of the door, and 3.5" inward from the right side of the door. (I used a tape measure, but a speed square can be used if available.)

An interior photo.


After measuring for placement, I followed the instructions provided and used a millimeter ruler to measure the dimensions to exactly 71 x 29 mm. It was time to cut out the panel.


I used my trusty (cheapo, but free) Dremel with a cutting disk.


It took about 5 minutes.


When removing the cut panel, I found the same spray-foam insulation was in the door as was under the top of the refrigerator. This stuff gets everywhere!


I drilled a hole in each corner of the cut-out with a 1/16" drill bit to show where I needed to cut the panel on the inside.


I used a utility knife to remove the inner panel.


Once the hole was finished it was a matter of mock fitting the controller, it took a little trimming of the interior panel. The key was to make a nice tight fit so there was no need for any sealant. The controller comes with a rubber gasket, and that is all I intended to use.


A snug fit was achieved. 


The easy part was finished. On to the wiring. (this is where I didn't snap photos, I apologize.)

A fellow brewer who goes by the name of ClaudiusB on the Home Brew Talk Forum, was integral to the success of my installation. He created a wiring diagram for me, which was exact. I can't thank you enough
Claudius!
I think the schematic above is more useful than my photo of the wiring, but here you can see it put together.


Sorry about the quality of this photo. I used male/female crimp connectors to connect all of the wiring from the controller to the fridge. I have all of the female connectors on the fridge side, and all of the male connectors on the controller side. If you look closely you can find them.

All of the wires are just shoved in the nook where the OE analog thermo was. I plan to get a piece of Plexiglas, or some PVC to fabricate a cover and screw it down keeping all the wires out of the way.

I also needed a way to install the temperature probe. I fabricated a housing out of a White Labs vial. It was extremely simple. I used a 5/16" drill bit to make a hole in the center of the cap. I was able to find a rubber grommet at ACE for $0.25 that fit perfectly. I shoved the temp probe in, and that was it. I filled the vial with Star-San sanitizer to keep mold and bacteria from growing in the vial.


I mounted the probe in the back of the kegerator, I am thinking of moving over to the side near where the original analog probe was, but for now it will stay where it is.


I have the fan wired to the compressor so it only runs when the compressor is on. I found that having it run all the time caused it to cycle more often.

As I mentioned earlier, I am working on a way to cover the wires, after that is finished this kegerator will be completed. For now it is done and fully operational.


FIN!


An anecdote...and I'll try to keep it short.

I have had this controller for a couple of months now, and I was struggling to find the time to do the install. A fellow brewer from HBT hooked me up with an awesome wiring diagram which I've detailed. However, another fellow brewer who lives nearby stopped by to help me out with the wiring and soldering. Nonetheless, we managed to cause a short and pop a breaker. Thank goodness the kegerator wasn't damaged! All of the initial wiring was only for mock-up to ensure everything worked before I made things "permanent". When I went to rewire everything, I moved my fuse wire which caused the display to go blank for a couple of seconds, and when power returned it failed to switch the compressor on. I was sure I killed the relay in the controller.

After some cursing, swearing and some physical interaction with the fridge, I took a well needed break. By this time my help was long gone. During my break I left everything plugged in hoping it would switch back on. After about a half an hour...still no dice. I was extremely angry, and it is my nature to jump to conclusions, so I was certain I had a $180 paper weight on my hands. I was so angry I left the kegerator alone for 4 days before I started to tinker with it again. Long story short I had changed one of the parameters (which was minimum stopping time, to 50 minutes). When the power failed while moving the fuse wire I realized the controller needed 50 minutes before it would resume its function. When I reset the controller's parameters to default it started cycling again.

Of course I reordered another controller in fear of having fried the relay. Of course I wanted the blue LED, so it is made to order, and of course they do not accept returns on custom orders.

Yeah, I'm a dumbass...

I'm telling you this so you can avoid the same mistake I made, and save yourself some energy cursing, swearing and kicking random inanimate objects!

I have a chest freezer I plan on installing the other controller in, so it worked out in the end.

Please comment or feel free to ask questions!