Thursday, July 28, 2011

Brewing soon

I just needed to bump my blog, I have been über busy with summer school, never taking to summer classes at the same time again! And I am never going to take a summer math course again unless it is absolutely necessary. I just don't have the time with work and family to do the full time student thing which IMO is really what you need to be able to do for summer school.

Anyhow all bitching aside, I will be brewing my first Saison soon, I might make it a Saison/Gose partigyle if I can work it out, but seeing as I only have a single pot an burner, I dunno if I could pull it off.  Come to think of it a fellow brewer just had his second kid, maybe he will be willing to lend me some equipment? We'll see I'm still deciding if I want that intense of a brew day, but I would love to have the two different varieties of beer in my kegerator.

Anyhow, stay tuned for the Saison brew day, I will document it as best I can. I need some more brewing related projects too, I think I'm going to build a Randall for my kegerator, but other than that, I don't know exactly what I want to add to my brewery next. Please comment with suggestions if you have any.

Well for those of you who have been following thank you for your support, I'll try to keep entries from being so far apart.

Tuesday, May 10, 2011

Pump Projekt

I have been wanting a pump setup for over a year now, and after I recently stepped down from my position at work to return to school finances have been something we have been monitoring closely.  All of that in addition to my sons first birthday, money has been tight to say the least.  So when my wife gave me the green-light to get what I needed to put together my No-Sparge/Rims setup, I was stoked!. . . And I probably went a little overboard. 

Thanks Sweetheart!

To begin, when I originally wanted to start my pump project, the March 809 pumps were selling for about $110.  Fast forward to about a year later--the lowest price has been steady at around $140.  An online source called Chugger Pumps has the best price by far ($125).  However, their +$12 shipping makes them only about $2 less than the other guys.  Needless to say, I was bummed at the nearly $30 increase in cost I was looking at paying.  I was keeping my eye on ebay because everyone I know that has a pump and a great majority of HBT'ers have purchased their March pumps from USA Pumps on ebay.  I caught a break when I saw a listing for $121.99 with free shipping, that was $18 less than most online prices, and it was $16 less than Chugger Pumps!  There were only two available, so I got permission from the finance department, and grabbed one.
Before I get into the actual build I want to make it clear, this isn't just a pump-in-a-tool-box build, this is the beginning of my no-sparge phase in my brewing process, hence the many additional fittings and such that you will see in my build parts list.  Having said that, on to the show.

Here is my build parts list, it will be updated as necessary:

(This is an interactive table, almost all parts are linked to the source, so click on any item you are interested in and the link will open in a new window.)


Beyond the pump itself, the backbone of this build is the enclosure the pump is mounted in.  I chose a tool box that is over sized. If you plan on tackling a DIY portable pump-box for yourself, my suggestion would be to err on the large side, you can never have too much storage for all of your brew day gear.


note: Of course, there are a couple of fittings that aren't in this photo because I had to make a supplementary order.  The missing fittings are mainly for my MLT and the kettle lid for recirculation during no-sparge brewing.  They are on the build list, but will come much later in this post, or in the following posts concerning the no-sparge brewing method.

There is one item that I think sets my box apart from the many I have seen, and that is the male receptacle:


This little beauty allows me to use any standard extension cord for a power source, sweet!


The next task to take care of was to cut the openings for the gang-boxes so they could be installed, and to cut the hole where the pump was to be mounted.


I have found that using a Dremel to cut plastic makes a mess, and in my opinion, isn't worth the hassle. My preferred method is to use a utility knife. The cuts are cleaner, and you have more control over the size of the hole being cut.  It takes a little more elbow grease, but the end result is well worth the additional effort.


All I had was a 2 3/4" hole saw on hand which was much too large, a fellow brewer was kind enough to lend me his 2 1/8" hole saw which was perfect for cutting the hole for the pump.

The old-work gang-boxes are a snug fit.


Next comes the wiring, I will provide a few pictures of some of the wiring, but all of the wires look like a jumbled mess inside the gang-boxes.  I think this diagram does more justice than the photos and is easier to understand.


Wiring the main power/male receptacle, (Green=Ground, White=Common, Black=Lead)


Here is everything you need to know about GFCI's, and their installation.


This is an image of the completed wiring in the box. Like I said it looks messy in the gang-box.  However, I will provide a list of how the wiring attaches in sequence, and you can refer back to the wiring diagram for verification.

(Male-Receptacle Common connects to the Silver screw on the Load-side of the GFCI, and the Lead wire connects to the bottom Brass screw of the Main-Power switch.  A Lead wire is then jumped from the Brass screw of the Load-side of the GFCI to the top Brass screw of the Main-Power switch, a Ground wire is attached to the Main-Power switch  Ground screw [this completes wiring of he Main-Power switch]. Jump a Lead wire from the Brass screw on Line-side of the GFCI to the bottom Brass screw of  the Pump-Power switch, attach the Lead wire from the Pump the top Brass screw of the Pump-Power switch, and connect a Ground wire to the ground screw of the Pump-Power switch, then connect the Common wire from the Pump to the Silver screw on the Line-side of the GFCI.  Wire nut all Ground wires to the Male-Receptacle ground wire [this completes the wiring for the box.] note: cap all loose wires with wire nuts.)


GFCI and Main-Power switch installed:


A semi-finished photo with the Pump-Power switch installed.


Corner shot with the Male Receptacle, GFCI, and Main Power switch.


...and the opposite side featuring the GFCI, Main Power switch, and the Pump Power switch.


...Pump Head installed...


Finally all box installations, and wiring complete. (look at that clean wiring!)


Ball valve, reducing coupler, and male camlocks fitted to the Pump Head.


I believe that does it for the Pump-In-A-Tool-Box-Build.

I  have yet to brew with this beauty that will be this weekend (15-May-2011, if a catastrophe doesn't occur). Hopefully I will have some photos of brew day with he pump in action.  This brew day will more than likely be a standard brew day rather than a no-sparge brwe day. I just got this bad boy together.  I need to figure out exactly how it will be integrated into my brew day before I attempt to start an entirely different way of brewing.

It is my understanding that no-sparge brewing can cut a decent amount of time off of brew day, but there are some drawbacks, such as lower brew house efficiencies due to  the lack of sparging/rinsing the grain of sugars.

I plan on brewing a 10 gallon batch of a BriticA, which will be a 50/50 - US 2-row/English Marris Otter base malt, with a bit of Munich and Crystal 40L, basically an APA/BPA, but I will be using American hops, Chinook and Amarillo. However, I will split the batch, and inoculate each 5 gallons with dfferent yeasts, WLP 001 California Ale, and WLP 023 Burton Ale.  So I will have a more American APA with some Marris Otter, and an English ale Ale with American Hops...It will be interesting.

Thanks for following, I hope this post inspires you if you are interested in a portable pump setup.

Please comment!

Friday, April 8, 2011

Fermentation Chamber Build

I have brewed a few beers since my last post which was about 4 months ago, an Apfelwein (not really a beer, but a brew nontehless), a Cascadian Dark Ale (Black IPA), a Rye Pale Ale, and I have a Strawberry Blonde that I added 12 pounds of crushed strawberries to about a week ago.

Needless to say I have been busy!

Living in Arizona makes it difficult to brew quality beer without some type of fermentation control. Previously I was using the "swamp cooler" method in which I had room for two fermenters in a 70 quart Coleman Xtreme chest cooler filled with water, and I was swapping ice bottles out multiple times a day.

With a donated fridge, and a little work I finally put together a fermentation chamber that will hold 3 fermenters, pales, or carboys, or 2 fermenters with 2 corny kegs.

So on with the show:

This is what the fridge looked like before. An older model Sanyo that was an R-12, opposed to an R-134 refrigerant.


 I removed the door, the door hinges, the feet, and the plastic top (no images) and all other hardware from the topof the unit.
The power cord was in bad shape, and I neded to replace it.

The first step was to frame the chamber, naturally I started with the base (ground up, right?).

Starting the skeleton, forgive the cloth diapers drying in the background ;P.

After I finished framig the walls, I mocked it up to make sure the fridge would fit, needless to say the fridge was not square whatsoever.

After the frame was all finished up, it was time to add the insulation. I used R-max 1.5" Polyiso insulation, it has the highest rating of the sheathing insulation that I could find, with a R rating of 9.5 (that's good!). As you can see I used bucket lids to ensure I could get three fermenters inside.

Side view with some insulation.


A view from the back. Nice thing about this older style fridge is that the cooling coils are all on the rear, outside of the unit, so it doesn't matter if I were cover the entire fridge.  The reason the back half of the fridge sticks out of the frame is because there is a ledge on the underside for the compressor mount, and the compressor mount itself is offset which would have made it un-level.

Top view; I built the chamber with a little extra room to spare.  I wanted the footprint to be as small as I could get it, but didn't want things so tight that it would become problematic to fit fermenters comfortably.

This is a semi-complete shot, I have the lid finished, still needs some temp control though.

Hinged, and a nice tight fit.

After all the inner-insulation was installed, all the seams were caulked with silicone sealant, and foil-taped.

I added a piece of scrap vinyl flooring I had lying around. It serves two purposes:
1. The polyiso insulation's foil skin tears and punctures easily, so the viny will keep the floor from being damaged by the fermenters.
2. In the event of a spill or an active fermentation that blows-off and makes a mess, clean up will be less difficult.

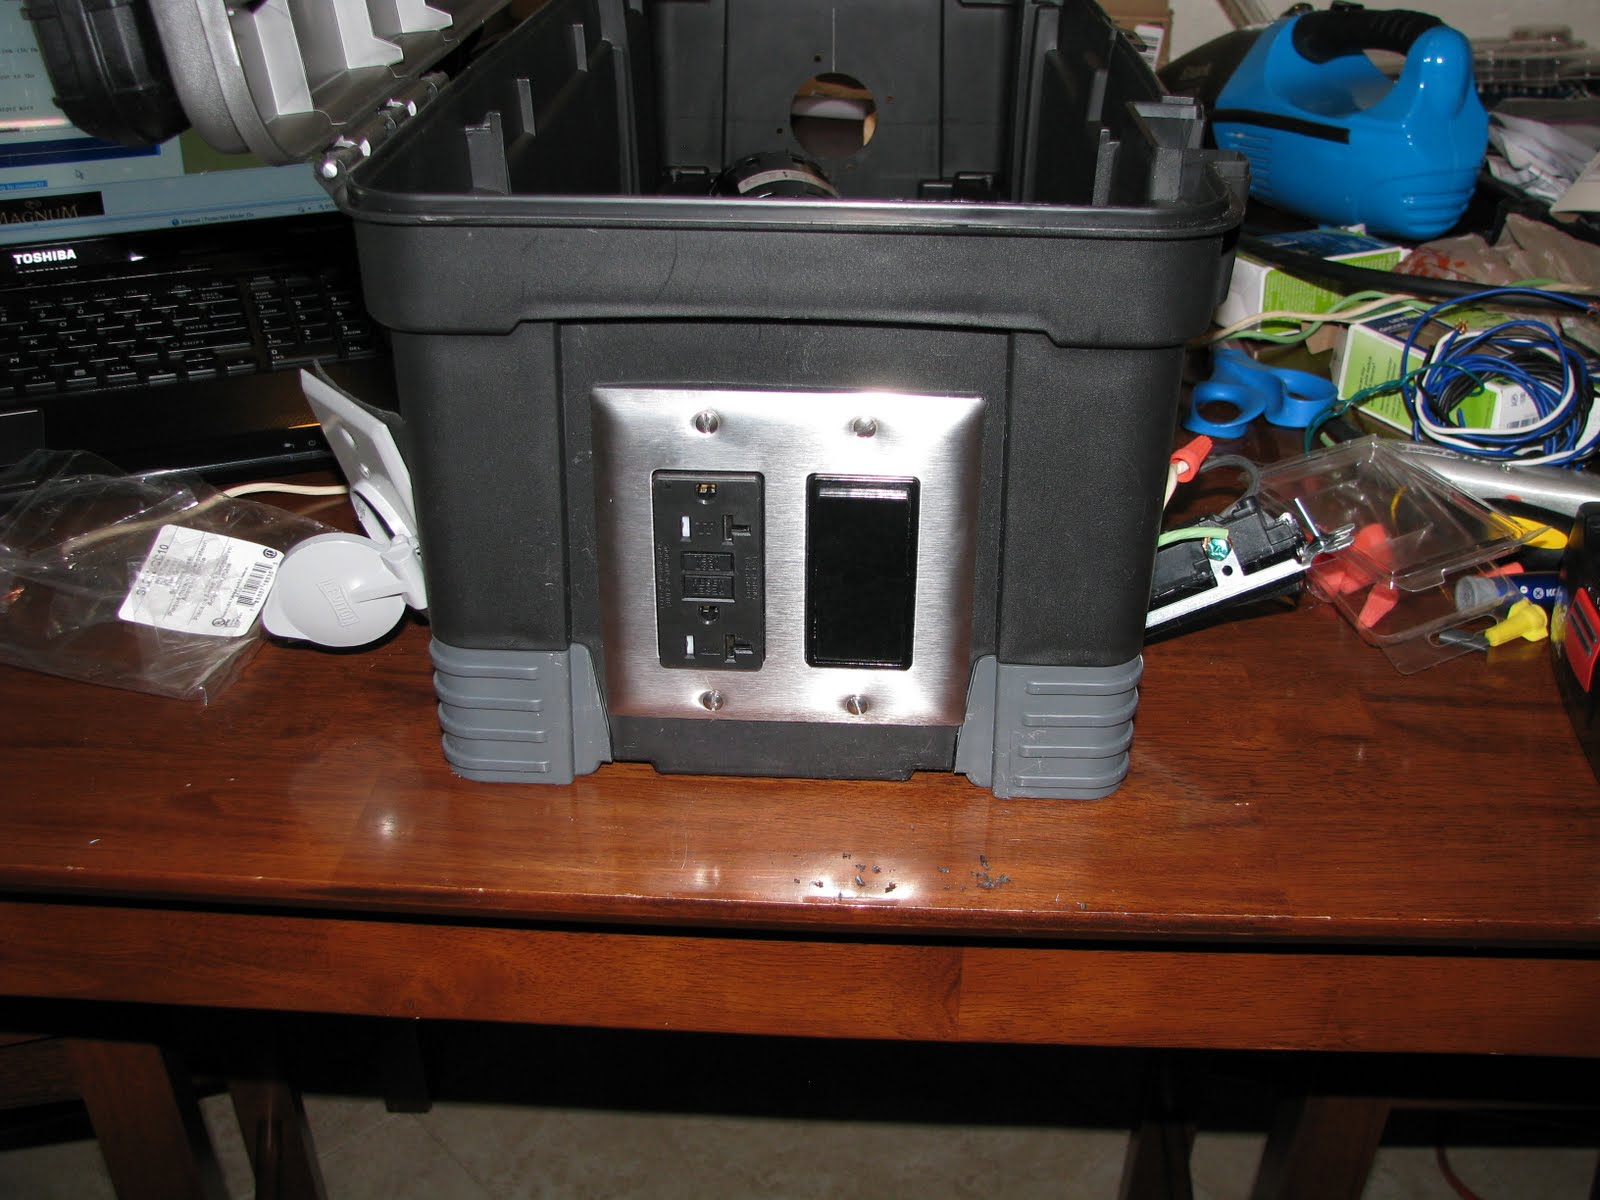
Time for some temperature control.  I like the Love TS-2 temperature controller made by Dwyer Instruments (the same type I have installed on my kegerator).  I like the blue LED that they are available in.  The installation cut is 29mm x 71mm.  My freebie wireless Dremel made easy work of the fridge's metal.


The foam insulation makes a mess when dug out, FYI.

I unfortunately didn't take the opportunity to photograph the actual wiring of the controller. I wanted to get this project done since it was taking longer than anticipated.  With school, and my one year old son, time is not something I have an abundance of right now.

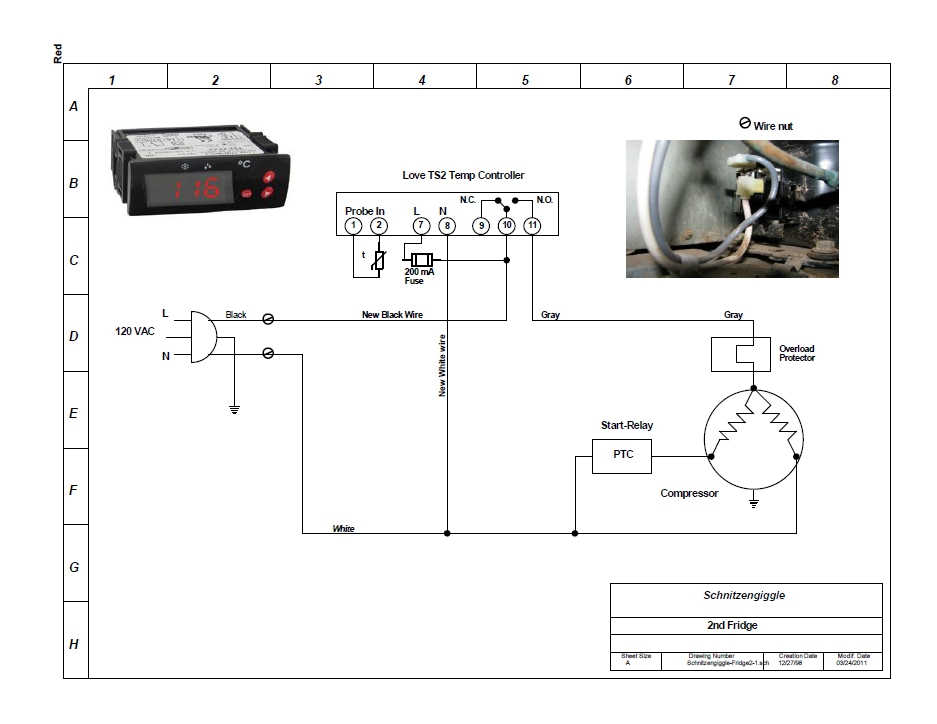
However, a fellow Home Brew Talk member (Claudius B), helped me out with a wiring schematic, very precise. Thanks Claudius!

Controller installed, outer insulation installed, and all insulation seams foil-taped.

The finished product came out quite nice with the insulation between the 2x4's on the outside, everything came out flush.

Temperature probe is approximately 5' long, and will be long enough for my needs.
I have been contemplating covering the outside with some very thin paneling or whiteboard, or chalkboard, possibly even a vinyl wrap, just to make it look a little nicer since it is inside our bedroom.  Luckily this fridge is really quiet, and the TS-2 relay click isn't obnoxious either.

The chamber holds temps really well, I do need to add a fan inside, some weather stripping around the lid, and I did not know exactly where my wife was going to allow me to put the fermentation chamber inside the house, so I need to turn the lid around since it opens away from the wall, so after I get those three little things done, I will update this post to be thorough.

Regardless, I can't wait to get some full fermenters in it to see exactly how it performs.  Next brew day, whenever that is, will be a 10 gallon brew day which will allow me to get 2 full fermenters in the chamber.

Stay tuned for an update!