Tuesday, July 20, 2010

Another mead gravity check...

Once again, I checked the gravity of my mead...

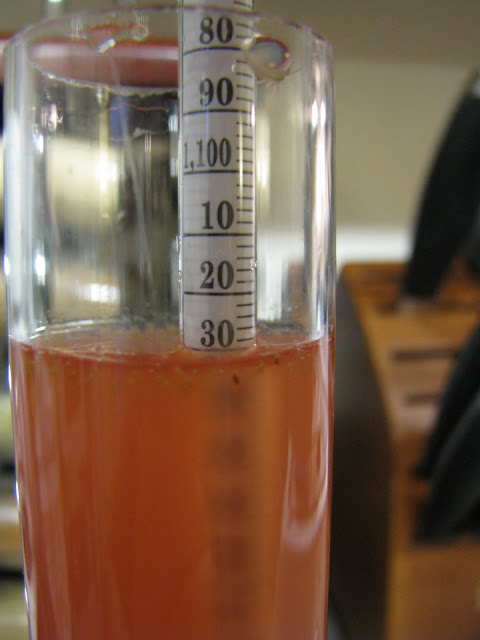
It has only been 4 days since my last SG check, but airlock activity has really slowed so I thought it would be a good idea to take another reading.

As you can see the SG reads about 1.0105-1.011, I'll call it 1.011 @ 76.8°F which adjusts to 1.013. A drop of 19 points in 4 days...it still amazes me.


I did  stir the must gently to degass it. Elevated co2 levels can become toxic to the yeast. Agitating by stirring or using a degassing wand, while not aerating releases a good deal of the co2 which can help the yeast fully attenuate.

I wanted to brew an American Strawberry Wheat this weekend, but work foiled my plans...again.

On a side note:
For those of you who know me well, you know that I will be attending the University of Arizona starting this fall. I don't know exactly what will be happening at my current job. It was explained to me that my schedule would be worked with, however, I have a feeling that is going to change. Regardless, I am giving up a great salary, though my work schedule sucks and work always seems to find away to ruin my personal schedule. Maybe I'm whining like a little girl, but for being a 14 year veteran I was under the impression that I would have to work harder yet have to be there less. It turns out I have to work harder and be there more, and after having my first born this past March, the prospect of me staying with this company is becoming less appealing. For the most part I enjoy my skill, but I detest the retail environment and being in upper management, I have the great opportunity of taking shit from both ends of the dookie spectrum.

My point being, maybe I will have more time to spend with my son:


...and more time to brew:

Friday, July 16, 2010

Mead gravity check.

As the title states, I checked the SG of my Prickly Pear Mead.

As you can see the gravity reads 1.030, however this measurement was at 76.8°F which adjusts to 1.032.


I need to rack the must off the lees once it reaches the SG of 1.000, therefore I am going to keep a close eye on the gravity over the next couple of weeks.

Monday, July 12, 2010

prickly pear mead update.

This morning my home smelled of sulfur...bad! My first question to my wife this morning was "honey, did you fart?!" Her reply was less than enthusiastic. However, the mead is fermenting away very vigorously.

Mashing grain to produce wort for beer includes most of the nutrients that the yeast requires to produce a healthy fementation, usually the addition of supplementary nutrients isn't required, yet many beer brewers, myself included, add nutrients to ensure a healthy, vigorous fermentation that will finish and reach terminal/target gravity. Having said that, honey lacks the nutrients required for the yeast to produce a dynamic fermentation, therefore, extra nutrients must be added.  According to the NAS (Nutrient Addition Schedule) 4.5g of DAP, and 4.5g of yeast energizer should be added at inoculation, and 2.8g of DAP, and 2.8g of yeast energizer should be added at active fermentation which is defined as a drop in Brix of 2-3°.

My OG was1.130, and my gravity this morning was SG - 1.114 @ 81°F = 1.117 corrected. Brix equivalent is 7.55° (1.130), to 4.33° (1.117), roughly a 3.22° drop in Brix, therefore "active fermentation" defined by the literature I have read had been achieved.

I used a Pyrex measuring cup to remove my gravity sample (approximately 1 cup of must), and I used this sample to add the additional 2.8g of both DAP, and yeast energizer. I boiled the cup of must, added the NAS, and placed it back into the sanitized Pyrex measuring cup with cellophane stretched tightly over the top, and into the freezer it went until it chilled below 70°F. After the cup of must chilled sufficiently I added it back to the fermenter, and gave it a gentle stir with a sanitized spoon to mix the solution well.

Needless to say, the mead is still fermenting away steadily. This is the loudest fermentation I have ever experienced thus far. The airlock bubbles steadily and is quite noisy. I hope the warmer fermentation temps do not cause detectable off flavors, but only time will tell.

I'm certain ther will be some undesireavle flavors, but age does wonderous things for all things fermented, just like the Apfelwein I'm sampling now...mmmmmmmmm.

Cheers!

Sunday, July 11, 2010

Prickly Pear cactus fruit mead brew day.

Unfortunately, I was unable to snap photos of this brewday like I wanted to, I was in somewhat of a time crunch, and I was already making a mess.

Despite the lack of photos, I can detail my first mead in script.

First and foremost, A quick lesson about prickly pear cactus fruit. The fuit is commonly referred to as Nopales (which I believe is incorrect as it is more accurate to call the actual prickly pear pads nopales). The fruits are also labeled as Indian Figs, cactus figs, or what I think most natives mexicans would refer to as tunas. The fruits are normally a deep maroon/burgundy color, and covered in glochids (a hairlike spine or needle that easily penetrates the skin, mouth and lips - care must be taken to remove them from the fruits) the cacti are native only to the western hemisphere, but have been introduced to other parts of the globe.

(Hint: a good sign that the fruits are ripe and ready to harvest is when you see the birds eating them, or signs of birds feeding on them.)

Second, the recipe. I basically took Charlie Papazian's Prickly Pear mead Recipe from his book The Complete Joy of Homebrewing 3rd Edition, and put my own spin on it.

20lbs - light honey (mesquite preferred)
5-6lbs - red ripe prickly pear fruits, tunas.
1/4 tsp - yeast nutrient
1 tbsp - pectin enzyme
1 oz - dried, rehydrated, sherry, wine or champagne yeast.

He details an elaborate method of harvesting and cooking the fruit in preparation it for the mead, but what I did is much simpler, and probably a more effective use of the fruit. For what it's worth, boiling the fruit or honey will drive off much of the aromatic qualities; avoid boiling if possible. Last year sometime, I'd guess around August 2009, I harvested some tunas from the cacti behind my home, I don't know exactly how many pounds of fruit I took off the cacti, but it amounted to 64 oz of pure tuna juice.

I picked the fruit from the caci with a pair of tongs, and handled them with leather gloves. I removed all of the glochids by rubbing the fruits vigorously with my gloves. Afterward, I rinsed them under cool water using the tongs. I proceeded to peel them, halved them, and scooped out the seeds with a spoon, and tossed them into the Cuisinart. I pureed the tunas, and strained as much pulp out as I could manage with a funnel and strainer. I fiiled two 32 oz canning jars, and into the freezer they went, and stayed until this July.

(Hint: an excellent strainer media is a paint strianer bag, or even a reusable coffee filter, be warned though the pulp will clog filters quickly, so make certain to stir while straining, and have more than "filter" available in casr of a clog. Also, be aware these fruits will stain almost anything!)

I filled a pot with 2.5 gallonsof water, added the fruit juice, and pasteurized at ~165°F for about 30 minutes. When the 30 minutes expired, I added the 20 lbs of Mesquite honey to the fruit juice/water mixture, and pastuerized for an additonal 30 minutes. While everything was simmering, I skimmed any scum, and pulp from the surface. In the last 10 minutes of the boil I added my yeast nutrient (DAP/diammonium phosphate, and yeast energizer, which I do not know exactly what the contents are since it is generic from my home brew shop.)

After the time was up, I tried chilling the must as best I could, but I was ill prepared. I didn't have anough ice or chilled water, so I did the best I could with what I had (RDWHAHB, right?). While everything was cooling, I rehydrated 25g of Champagne Yeast in 2.5 cups of 100°F water and let it stand for about 15-20 minutes.

Ironically, after I inoculated the must with the Champagne yeast, I found that it is not the best choice for mead...whatever, it's my first attempt, and I'm sure it will still be good, wait ...no...great!

I poured the contents of the kettle (fruit juice, honey and water mix) into my 6.5 gallon fermenter, and topped up with enough cooled water to make 6.25 gallons. I took a gravity reading:

1.130 @ 64°F = OG 1.130


It's hard to tell in the photos, but the must is the color of pink lemonade.

I checked the temperature of the must and it was still 92°F! I had no choice but to pitch my yeast since it was ready.

Stay tuned...

Saturday, July 10, 2010

BDSA update #4...racked to keg.

This weekend is the keg tapping party for a fellow brewer, and Tucson Homebrew Club member, who won the National Homebrew Competition's Pro-Am for our area. The event was held at Thunder Canyon Brewery, one of three local brewpubs in our area. It is a Belgian Dark Strong Ale/Belgian Quadruple. The Pro-Am is a category that will be judged at the Great American Beer Festival. I felt that it was a perfect day to make some progress with my BDSA. Therefore, I finally racked my BDSA to the keg after a 5 week primary! It was finished at 4 weeks, but I could not find the time to rack this beer sooner.

While on the topic of racking, I had to purchase a new auto-siphon due to the fact my original siphon finally broke. It had a small crack forming near the plunger end of the racking cane that spanned the circumference of the cane itself, and it  finally came apart.

Having said that, the new auto-siphon cane is a bit smaller than the first, and the tubing I was using no longer fit snug. While racking the siphon continued to break, as well as sucking air in-around the cane through the tubing. I'll assume that some aeration was occuring. This can be problematic with long term beer storage, apparently it can cause a wet cardboard flavor from oxidation.

Once I had the beer in the keg I charged the keg to 30 psi to seal the lid, and I rolled it on the floor back and forth for a couple of minutes in an attempt to counteract any oxidation from the aeration that may have occured during racking. I purged most of the co2, leaving approximatley 2-3 psi in the keg.

Regardless, I took a fFG (final, Final Gravity), it hadn't changed from wek 4 to 5. I will state that the pronounced banana note has subsided and mellowed into the background. From week 4 to week 5 there is a considerable change to the flavor of the beer, the warm alcohol in the back of the throat has also smoothed out considerably.

The FG(note where the meniscus meets the hydrometer, this is the proper place to record the measurement).


1.018 @ 72.6°F = 1.020 corrected for temperature.


Next update will be when I tap the keg, maybe around October. It will be a very good fall/winter warmer.

Stay tuned for BDSA update #5. Tapping and tasting...my favorite part! (If you are following this blog leave a comment and if you are intersted in sampling this beer leave an email contact.)

Cheers!

Monday, July 5, 2010

BDSA update #3, the numbers are in...

The check of my BDSA this evening yielded a SG of 1.018 @ 74°F, which corrected comes in at 1.020. The estimated FG was 1.023, so I pretty much hit my mark after the 2.5 lb turbinado sugar addition. Ironically enough, I used a calculator for the adding the sugar which stated the sugar addition needed to be 2.5lbs, and in a previous post I did the math by "hand" and it showed I only needed 2.25lbs, I wonder if the .25lb is the difference between my estimated FG of 1.023, and my actual FG of 1.020. There is only a 0.5% differnece in the ABV, but I'd rather make my clacs by hand if they are more accurate than the calculator. I used the calculator because it takes into account the volume the sugar adds. Regardless, the numbers are close enough, however I'm still curious.


The numbers:

OG - 1.087

SG - (after 2.5 lb sugar addition) 1.103

FG - 1.020

That's an ABV of 10.91% and 79% Apparent Attennuation!

The sample had the warmth of alcohol in the throat, a nice maltiness and some clove flavor, with a pronounced banana note. It was quite tasty for being as young as the beer is. I'm certain that after a few months of aging this beer will be exceptional, and with its 11% ABV, drinking only one will put you in your place.

I plan to bulk age this beer in a keg for 3 months, then I will use additional yeast and prime a portion of it for bottle conditioning, while leaving the reamider on tap. The advantage of bottle conditioning is that the yeast helps to allow the beer to stay "fresh" longer during the aging/conditoning process, and it isn't uncommon to age a beer this "big" for over a year.

I hope to rack this beer to the keg tomorrow, and I will take a final SG sample to be thorough and make certain the FG hasn't changed. I'm also going to rinse ( I prefer the term "rinse" opposed to "wash", because I'm not actually acid washing the yeast) the yeast, which I may chronicle in my next post if I can remember to snap photos. If not, I will be sure to detail the process in a later post.

I am almost out of the North English Brown that I brewed  May 8th, 2010;  a nice sessionable beer at 4% ABV.  The keg will be kicked any pour now, and I would like to have something on tap, so as usual my plans may change, so stay tuned for update #4.

Cheers!